Wednesday, 3 April 2019

Continued work on MQTT Dash android app

I'm using mayo_rpi_logger_2 (192.168.1.136 port 1884) as the internal MQTT broker.
It is username/password protected.

Using Memu android emulator on my Windows 10 laptop I currently display:


When I issue the following manual command on the RPi:

pi@mayo_rpi_logger_2:~ $ mosquitto_pub -d -u USERNAME -P PASSWORD -r -t sport/gaa/football/mayo -m "20190314165200;Mayo for the Sam 2019;Mayo,GAA,2019,Sam,McGuire;Latest results indicate that Mayo is favourite to win the Sam McGuire cup this year;http://discoverbundoran.com/wp-content/uploads/2014/09/sam-maguire.jpg"
Client mosqpub/11742-mayo_rpi_ sending CONNECT
Client mosqpub/11742-mayo_rpi_ received CONNACK
Client mosqpub/11742-mayo_rpi_ sending PUBLISH (d0, q0, r1, m1, 'sport/gaa/football/mayo', ... (217 bytes))
Client mosqpub/11742-mayo_rpi_ sending DISCONNECT

And clicking on the "Image" button opens the Chrome browser to display the image:

So for a demo I would like to have a web portal which would allow me to select one of several messages:


Added more users:

pi@mayo_rpi_logger_2:~ $ sudo mosquitto_passwd -c /etc/mosquitto/accesslist.txt USERNAME1
Password:
Reenter password:
pi@mayo_rpi_logger_2:~ $ cat /etc/mosquitto/accesslist.txt
USERNAME1:$6$0bI37xN+pfo0hwcU$/3yLjIJ6UKSwzTeMFdHbSoJFcVM40ZnYebCHxmo3eEIYUqJ8fTpoVD3TJ8Er3n0oZT8buaqziODjmRDBuws+rQ==

pi@mayo_rpi_logger_2:~ $ sudo mosquitto_passwd -b /etc/mosquitto/accesslist.txt USERNAME2 PASSWORD2
pi@mayo_rpi_logger_2:~ $ cat /etc/mosquitto/accesslist.txt
USERNAME1:$6$0bI37xN+pfo0hwcU$/3yLjIJ6UKSwzTeMFdHbSoJFcVM40ZnYebCHxmo3eEIYUqJ8fTpoVD3TJ8Er3n0oZT8buaqziODjmRDBuws+rQ==
USERNAME2:$6$S5GNhhsaVtc+kWRY$5EliUGn7NEP4m5eFf8P4JnIKUMWuKZBOTz2Cyn9A8fqov3PwYcTncVlOLug8fXkGQGHAxtsbCHOeVHEpRP0bdA==

Then restarted the MQTT broker:

pi@mayo_rpi_logger_2:~ $ sudo systemctl stop mosquitto
pi@mayo_rpi_logger_2:~ $ sudo systemctl start mosquitto

So now to make web page to publish a Mayo result

First to fix the .py scripts executing:
pi@mayo_rpi_logger_2:~ $ cd /etc/apache2/mods-enabled/
pi@mayo_rpi_logger_2:/etc/apache2/mods-enabled $ sudo ln -s ../mods-available/cgi.load
pi@mayo_rpi_logger_2:/etc/apache2/mods-enabled $ sudo service apache2 reload

Great!

Also had to ensure this file was OK:

pi@mayo_rpi_logger_2:/etc/apache2/mods-enabled $ cat /etc/apache2/conf-available/serve-cgi-bin.conf
<IfModule mod_alias.c>
        <IfModule mod_cgi.c>
                Define ENABLE_USR_LIB_CGI_BIN
        </IfModule>

        <IfModule mod_cgid.c>
                Define ENABLE_USR_LIB_CGI_BIN
        </IfModule>

        <IfDefine ENABLE_USR_LIB_CGI_BIN>
                ScriptAlias /cgi-bin/ /var/www/html/cgi-bin/
                <Directory "/var/www/html/cgi-bin">
                        AllowOverride All
                        Options +ExecCGI -MultiViews +SymLinksIfOwnerMatch
                        Require all granted
                        SetHandler cgi-script
                </Directory>
        </IfDefine>
</IfModule>

# vim: syntax=apache ts=4 sw=4 sts=4 sr noet

That got my .py scripts to execute in Apache2 :)

Now to create a cgi-bin/MQTT_functions.py library to provide the MQTT publish function

I used this exam
ple:
https://stackoverflow.com/questions/31775450/publish-and-subscribe-with-paho-mqtt-client

and did a:
pi@mayo_rpi_logger_2:~/Mercury $ pip install paho-mqtt

Got  a bit of a demo going...

Script running on:
pi@mayo_rpi_logger_2:~/Mercury $ ./random_mqtt_pub.py

Publish one of 5 random topics + messages

which MQTT Dash can see:

If i had time I'd make a connection for each topic being monitored:


topics = [ "sport/gaa/football/mayo",
           "news/world/uk/brexit",
           "community/clare/shannon/wetlands",
           "community/clare/shannon/watch/tola",
           "community/clare/shannon/watch/cronan" ]

headlines = [ "Mayo wins the Sam!",
              "Tressa May resigns",
              "Major funding announced",
              "Break in last night",
              "Suspicious van" ]

keywords = [ "Mayo,GAA",
             "Brexit",
             "Shannon,Wetlands",
             "Guards",
             "Guards" ]

details = [ "Wonderful win over Dublin 10-5 to 2-3",
            "PM leaves saying country is ungrateful and her colleuges are snakes",
            "Microsoft provid 2M funding for Shannon",
            "Guards are asking for witnesses",
            "Pate number 202 D 122345" ]

images = [ "http://sway.ie/wp-content/uploads/2015/02/sam-maguire-cup-pic.jpg",
           "https://s-media-cache-ak0.pinimg.com/736x/fd/9f/0f/fd9f0f271e7449bfc01a846845adf735--theresa-may-teresa.jpg",
           "http://www.galvbaydata.org/galvbaydata.org/Portals/2/images/A_Sipocz_ABNC_wet.jpg",
           "https://i.ytimg.com/vi/9NIab5zKzdA/maxresdefault.jpg",
           "http://www.breakingnews.ie/remote/media.central.ie/media/images/b/BandonGardaStation_large.jpg?width=600&s=bn-653620" ]


Tuesday, 2 April 2019

Got NodeMcu and DHT11 to work..

Spent the day on my monthly accounts and only just getting back to NodeMcu work :)

So used NodeMCU PyFlasher to burn new image to flash (see earlier posts for details) and then ran C:\Users\kilnageer\Documents\CoderDojo\2018 Reboot\CH Project\NodeMcu\ESPlorer\ESPlorer.jar to develop the application code :) (also covered earlier)

So I now need an lua app which will:
1) read a room temperature from a DHT22 sensor over a NodeMcu digital input
2) and then publish it to a remote MQTT broker over the local wifi.

So 1) achieved using code at:
https://stackoverflow.com/questions/35383183/reading-dht22-sensor-with-nodemcu


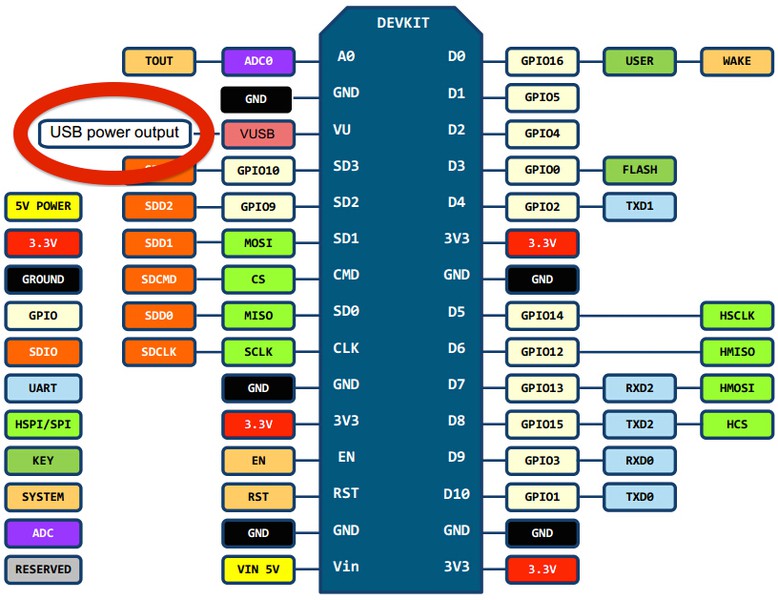
and pin-out from:
http://www.uugear.com/portfolio/dht11-humidity-temperature-sensor-module/
https://www.tdegypt.com/wp-content/uploads/2016/06/esp8266-nodemcu-dev-kit-v3-pins.jpg

which resulted in the following output :) (I can swap DHT11 module for DHT22 sensor later :))


So now on to 2). I will use the code at:
https://www.foobarflies.io/a-simple-connected-object-with-nodemcu-and-mqtt/

Cobbling it all together I used the following code:
(NOTE: real passwords changed to PASSWORD :) )

function GetSensorData()
    print( "Trying to get temperature..." )
    pin = 4
    status, temp, humi, temp_dec, humi_dec = dht.read(pin)
    if status == dht.OK then
        print("DHT Temperature:"..temp..";".."Humidity:"..humi)
    elseif status == dht.ERROR_CHECKSUM then
        print( "DHT Checksum error." )
    elseif status == dht.ERROR_TIMEOUT then
        print( "DHT timed out." )
    end
    return temp
end

-- MAIN
print( "NodeMcu temperature monitor v0.1 02-Apr-19" )
-- Lets see if we are already connected by getting the IP
ipAddr = wifi.sta.getip()
if ( ( ipAddr == nil ) or  ( ipAddr == "0.0.0.0" ) ) then
  print("Configuring WIFI....")
  wifi.setmode(wifi.STATION)
  station_cfg={}
  station_cfg.ssid="Tola Park"
  station_cfg.pwd="PASSWORD"
  station_cfg.save=true
  wifi.sta.config(station_cfg)
else
  print("Already connect to WIFI....")
end
print(wifi.sta.getip())

sensorID = "temp_001"    -- a sensor identifier for this device
tgtHost = "192.168.1.136"    -- target host (broker)
tgtPort = 1883          -- target port (broker listening on)
mqttTimeOut = 120        -- connection timeout
mqttUserID = "pi"        -- account to use to log into the broker
mqttPass = "PASSWORD"     -- broker account password
dataInt = 5           -- data transmission interval in seconds
topicQueue = "/temps"    -- the MQTT topic queue to use


-- Function pubEvent() publishes the sensor value to the defined queue.

function pubEvent()
    rv = GetSensorData() -- read temp
    pubValue = sensorID .. " " .. rv        -- build buffer
    print("Publishing to " .. topicQueue .. ": " .. pubValue)   -- print a status message
    mqttBroker:publish(topicQueue, pubValue, 0, 0)  -- publish
end


-- Reconnect to MQTT when we receive an "offline" message.

function reconn()
    print("Disconnected, reconnecting....")
    conn()
end


-- Establish a connection to the MQTT broker with the configured parameters.

function conn()
    print("Making connection to MQTT broker")
    mqttBroker:connect(tgtHost, tgtPort, 0, function(client) print ("connected") end, function(client, reason) print("failed reason: "..reason) end)
end


-- Call this first! --
-- makeConn() instantiates the MQTT control object, sets up callbacks,
-- connects to the broker, and then uses the timer to send sensor data.
-- This is the "main" function in this library. This should be called
-- from init.lua (which runs on the ESP8266 at boot), but only after
-- it's been vigorously debugged.
--
-- Note: once you call this from init.lua the only way to change the
-- program on your ESP8266 will be to reflash the NodeCMU firmware!

function makeConn()
    -- Instantiate a global MQTT client object
    print("Instantiating mqttBroker")
    mqttBroker = mqtt.Client(sensorID, mqttTimeOut, mqttUserID, mqttPass, 1)

    -- Set up the event callbacks
    print("Setting up callbacks")
    mqttBroker:on("connect", function(client) print ("connected") end)
    mqttBroker:on("offline", reconn)

    -- Connect to the Broker
    conn()

    -- Use the watchdog to call our sensor publication routine
    -- every dataInt seconds to send the sensor data to the
    -- appropriate topic in MQTT.
    tmr.alarm(0, (dataInt * 1000), 1, pubEvent)
end

print("Starting temp monitor..")
makeConn()

Which gives the output:

NodeMCU custom build by frightanic.com
branch: master
commit: 11592951b90707cdcb6d751876170bf4da82850d
SSL: false
modules: dht,ds18b20,file,gpio,mqtt,net,node,tmr,uart,wifi
 build created on 2019-03-31 09:31
 powered by Lua 5.1.4 on SDK 2.2.1(6ab97e9)
No init.lua yet!
> dofile('test.lua')
NodeMcu temperature monitor v0.1 02-Apr-19
Already connect to WIFI....
192.168.1.145 255.255.255.0 192.168.1.254
Starting temp monitor..
Instantiating mqttBroker
Setting up callbacks
Making connection to MQTT broker
> connected
Trying to get temperature...
DHT Temperature:20;Humidity:21
Publishing to /temps: temp_001 20
Trying to get temperature...
DHT Temperature:20;Humidity:27
Publishing to /temps: temp_001 20
Trying to get temperature...
DHT Temperature:20;Humidity:27
Publishing to /temps: temp_001 20
Trying to get temperature...

And looking at the MQTT.fx output:

So I just need to clean it all up and change file name to init.lua.This means:

1) Replace DHT11 module for a DHT22 sensor - which gives better temperature range and accuracy and uses less power as no red LED always on :)
2) Change the topic to be /sensors/temp/XXXX (where XXXX is the NodeMcu id)
3) Run standalone from a battery and field test it.

NOTE: Code will need to be customised for Kilnageer and re-flashed

Have runtime error running code:

Making connection to MQTT broker
> failed reason: -5
Publishing to /temperatures/NodeMcu_2650591: 27
PANIC: unprotected error in call to Lua API (init.lua:54: not connected)

Did major reworking of code started to look good then wouldn't connect to wifi anymore!

NodeMcu temperature monitor v0.3 02-Apr-19
> Configuring WIFI..
nil
Configuring WIFI..
nil


Sunday, 31 March 2019

NodeMcu temp sensor continued...

Did another NodeMcu firmware build at: nodemcu-build.com

Of: "You successfully commissioned a NodeMCU custom build from the master branch. You selected the following 10 modules: dht ds18b20 file gpio mqtt net node tmr uart wifi."

So MQTT and DHT22 and DS18B20 temp sensor support added.

Saturday, 30 March 2019

Getting a NodeMcu temperature monitor working..

Tore myself away from the TV and feeling in a programming kinda mood after a CoderDojo mentor's meeting earlier I decided to burn some code to a NodeMcu :)
http://www.nodemcu.com/index_en.html

So I followed the steps at: https://nodemcu.readthedocs.io/en/master/en/getting-started/

And so first I made a generic build at: https://nodemcu-build.com/index.php which e-mails you progress :)

I then download to my Windows 10 laptop the resulting binary:
nodemcu-master-7-modules-2019-03-30-20-05-51-integer.bin

I then downloaded NodeMCU PyFlasher and updated my USB serial driver. I then ran and flashed the binary. It was painless :)


Not sure how to test what was flashed though!

I think I need debug out from the device :) The pins are all labelled so GND, TX0, RX0 should do me to a USB serial converter :)
https://iotbytes.wordpress.com/nodemcu-pinout/

Well that worked straight away!


Now what to do? I want an ambient temperature probe to publish to a MQTT topic over Wifi.

Tried connecting to ESP_2871DF on 192.168.4.1 over wifi using fixed IP 192.168.4.2 but nothing shown using Explore Edge browser

So I need to read up on both UART and WIFI module as built into the binary image :)

Ah I've downloaded the firmware modules but I now need to download a program to use them!!
https://frightanic.com/iot/tools-ides-nodemcu/

I downloaded ESPlorer https://esp8266.ru/esplorer/ and ran it (after unzipping) the serial console worked fine when connected to COM6 at 115200 baud and after reseting the NodeMCU next to download some code to it.

So I read:
#http://esp8266.ru/download/esp8266-doc/Getting%20Started%20with%20the%20ESPlorer%20IDE%20-%20Rui%20Santos.pdf

Great followed the instructions and got a flash blue LED going on my NodeMcu as file init.lua :)


Then I removed NodeMcu from laptop and ran it from a USB battery pack :)

Worked fine
(Add photo)

Now for some real code :) So over to: https://github.com/nodemcu/nodemcu-firmware/tree/master/lua_examples

I tried the following code (with real "SSID" and "password" values):
print(wifi.sta.getip())
wifi.setmode(wifi.STATION)
station_cfg={}
station_cfg.ssid="SSID"
station_cfg.pwd="password"
station_cfg.save=true
wifi.sta.config(station_cfg)
print(wifi.sta.getip())

which produced the following Wifi Router entry:
NODE-2871DF_WirelessEC:FA:BC:28:71:DF192.168.1.146

Great! Now to publish to MQTT broker! Then to read a temp sensor :)

Will do this tomorrow following:
https://www.foobarflies.io/a-simple-connected-object-with-nodemcu-and-mqtt/


NodeMcu ESP-10S modules have arrived..

Just got these this morning:10x ESP-01S NodeMcu modules arrived today from China 14 euro the lot!. Serious bit of kit  Wifi and digital and analogue inputs. I'll be making battery powered room temp sensors sharing MQTT data over wifi  Pretty nerdy huh?


Wednesday, 27 March 2019

Kilnageer Central Heating


I have done much with automating central heating controls (Node-Red, MTTQ, sonoff, etc.) over the last 6 months and must update this blog!


Monday, 28 August 2017

Monitoring charge controller with a laptop

This is about replacing the MT-1 solar meter with a cable to a laptop. This would then allow remote monitoring over the internet rather than having to physically look at a meter periodically.

Just plugged in RS-485 to USB converter into my Linux laptop and saw:

kilnageer@kilnageer-Latitude-D630:~$
kilnageer@kilnageer-Latitude-D630:~$ sudo dmesg -c
[ 1305.616127] usb 5-1: new full-speed USB device number 3 using uhci_hcd
[ 1306.179490] usb 5-1: New USB device found, idVendor=0403, idProduct=6001
[ 1306.179495] usb 5-1: New USB device strings: Mfr=1, Product=2, SerialNumber=3
[ 1306.179498] usb 5-1: Product: FT232R USB UART
[ 1306.179502] usb 5-1: Manufacturer: FTDI
[ 1306.179505] usb 5-1: SerialNumber: A9QTLJ7F
[ 1306.346625] usbcore: registered new interface driver usbserial
[ 1306.347271] usbcore: registered new interface driver usbserial_generic
[ 1306.347408] usbserial: USB Serial support registered for generic
[ 1306.365789] usbcore: registered new interface driver ftdi_sio
[ 1306.366696] usbserial: USB Serial support registered for FTDI USB Serial Device
[ 1306.366813] ftdi_sio 5-1:1.0: FTDI USB Serial Device converter detected
[ 1306.366938] usb 5-1: Detected FT232RL
[ 1306.369611] usb 5-1: FTDI USB Serial Device converter now attached to ttyUSB0
kilnageer@kilnageer-Latitude-D630:~$

So hopefully I may see some comms to the charge controller over ttyUSB0


kilnageer@kilnageer-Latitude-D630:~$ sudo screen /dev/ttyUSB0 9600

(Nothing on screen after a few seconds so gave up)

Ctrl-A \ (to quit)
[screen is terminating]

So time to debug!

kilnageer@kilnageer-Latitude-D630:~$ lsusb | grep Future
Bus 005 Device 003: ID 0403:6001 Future Technology Devices International, Ltd FT232 USB-Serial (UART) IC